Pages

Sunday, January 18, 2015

I am a Guest Designer for Treasured Memories Canada!

I have the very great pleasure to be a guest designer for Treasured Memories Canada scrapbook store in Kamloops, BC.  My first project is an encouragement file folder tag book.  I found a number of examples on Pinterest which all contributed to my design.

The cover is decorated with Petaloo flowers, Wild Orchid leaves,
Spellbinders die cut hearts, gross grain ribbon, cute little charms and sparkly letters.

I love encouraging people and I think this little book is perfect to give as a gift to a friend who needs an encouraging boost. I plan to fill it with encouraging notes, anecdotes, special sayings, verses and poems.

I filled the pockets with lots of tags 3 1/2 x 6 1/2 as well as tags die cut from Labels 28.

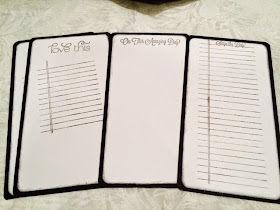
I used the KaeserKraft Teddy Bear's Picnic 6x6 pad, one of the 12x12 pocket card pages, and one 12x12 page for the cover.  Here is a picture of all the tags:

I will probably add more tags for my encouraging notes.

The back of the tags are stamped with Penny Black Love This Life Journals clear stamps,
and JustRite A New Day sentiment stamps

Here are the back views....

I added lace and more of the red gross grain ribbon.

The pocket cards on the back allow tags to slip under part of the card.
The back pages are secured with a magnet to keep it closed.

Just in case you are curious, I used a black file folder from Monks.  Open the folder and fold up about 4 inches of the bottom.  Then fold over the left and right sides so that the back lines up.

I cut off a bit of the tab to make it look neater.

No matter what design you choose to use I think it is a great idea to give the gift of encouragement to someone in need.  We can all use a little boost from time to time!

I hope you enjoyed this little book made especially for Treasured Memories Canada in Kamloops!

Have a super scrappy day!
NancyD


Sunday, January 11, 2015

"Max Your Mini" Album with My Minds Eye

I am capitalizing on my purchase of the Max Your Mini album tutorial from Paper Phenomenon by making another album from the same tutorial.  The really great thing about this tutorial is that you can mix up the page designs to create an album that looks completely different from the last one.


I have to say that I am swooning over two paper collections from My Minds Eye - Chalk Studio and Cut & Paste - Flair.  I love them both and together they are dynamite!  The black chalk paper combined with the tasteful shabby blues and pinks really work together to make lovely pages.

Inside cover with large tag and the beginning of the first page.

Open the first flap the magic.  This first flap has a pocket card glued on one side only
so that you can slip in photos or tags.

This is the back of the first page. I haven't decorated all the tags yet.


Open all the flaps on the back of page 1.

I used the 12x12 kit and the 6x6 pads from both collections as well as Cut & Paste brads, chipboard stickers, decorative stickers and the buttons.  My cover is made with the MME Record it All Things Chalk paper.


Bits of page 2

I used the stickers and chipboard pieces.

A little teal coloured ribbon is nice.

I plan to use this album for pictures of my husband and I from this point forward.  All the kids have finally flown the coop and that allows hubby and I to travel a bit and do more things on our own.  So the pictures are going to be more about our romantic journey and less about the kids buzzing around.

A few more random page parts.....


I made two involved tags for the front and back cover pockets.  This is the first one and turned out to be too big to fit the pocket.  The tag has two fold-out picture spots.


The inside pages have partially glued strips so that you can slip in the pictures.

Project Ingredients:
  • Paper: Recollection Black Cardstock, My Minds Eye Chalk Studio and Cut & Paste Flair
  • Tutorial: Max Your Mini (witches brew) from Paper Phenomenon
  • Embellishments: MME Cut & Paste Flair brads, stickers, chipboard stickers and buttons, EK Success spiral bound edge punch
  • Inks and Markers: I inked all the edges with Ranger Distress Black Soot

Challenges to Enter:


Have a wonderful scrappy day!
NancyD

Monday, January 5, 2015

Birthday Scrapbook with Graphic 45 Time to Celebrate

Hi everyone, I have a new scrapbook to share!

This special peachy colored book is made with the Graphic 45 Time to Celebrate paper collection.  I focused on the papers that were neutral or specifically for birthdays and ended up with this beauty.


As you can see I fussy cut out two birthday images and hid them among the beautiful Petaloo and Wild Orchid flowers.  The chipboard piece is emphasized by cardstock which also helps to hide the magnet closure.

Here are the 1st page pictures....

This is inside the cover and the first page

On the left I added several flaps and pocket to the inside cover.
Open the first flaps to reveal pockets, pockets and more pockets.

This is the page fully open to the base pocket.
 I used a Kathy Orta tutorial from the Holiday Kit Club #2 (this past Oct/Nov/Dec).  The album was originally called the Witches Brew because of the great papers that Kathy chose to work with at the time.  The album is very interactive and designed so that we can mix and match pockets and pages to actually design our own album.

Here are the pics for Page 2....

First flap open
All open
The back with tag
I used Chocolate Paper Accents cardstock from Scrapadbadoo and I purchased the Graphic 45 paper at my local scrapbook store, Scrapbook Central (this store has the best selection in BC!).

Here are the pics for page 3 ....


Love the cut outs from this paper collection!
I made 5 pages in this album with a 3 inch spine.  The book measures 8 1/2 by 8 1/2 and is perfect for 4x6 photos.

Supply List:
Paper: Graphic 45 Time to Celebrate (2 8x8 pads and a couple 12x12 pages), Paper Accents Chocolate Brown, Bazzill orange and green
Tutorial: Holiday Kit Club #2 Witches Brew from Paper Phenomenon
Embellishments: Petaloo and Wild Orchid flowers, RRR ribbon

It is time for me to return to entering challenges:

I hope you enjoyed my new mini album.  Do check out the tutorial, the title may be deceiving but the tutorial is excellent!

Have a scrap happy day!
NancyD