Pages

Thursday, June 25, 2015

Camping Memories

I have been holding off showing this mini album because I wanted to put some of my family camping pictures in it first. But alas, time flies by and it has been a few weeks since I last posted a project.

This mini is from Kathy Orta's new Minutes to Memories tutorial.  It is a very fast project using a sewn in binding and pocket pages combined with large envelopes.  I was able to construct the base album in one evening.

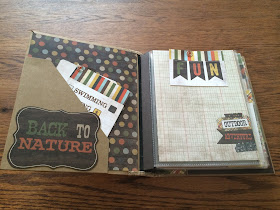
I used Simple Stories "Take a Hike" paper collection and Snap Pages.  The large envelopes are from the BoBunny MiscMe collection.  The cover looks pretty plain at this point because I will be adding a large picture of the family around the camp fire and probably some twigs and other woodsie embellishments.  Yes, that is burlap on the spine.


The inside front cover has a very nice angle pocket for extra tags or memorabilia.


 I never realized how quick a pocket page (or project life) style was put together.  Just cut the pretty paper and pictures to size and slip them in the pockets - no glueing!


As I add pictures I will remove some of the decorative papers from the pockets.  I will also add lots of stickers and surface embellishments to complement the photo subject.


In Kathy's original tutorial she uses a "signature" binding, making one signature to hold the pages.  I decided I wanted more pages so I made three signatures and sewed them directly to the spine.


This is such a great, easy scrapbook to make using just pocket pages and large envelopes. I can't wait to get my photos organized and into this book!

Have a wonderful scrappy day!
NancyD

Thursday, June 4, 2015

It's a Cute Purse, No Wait A Mini Album!

I have been a member of Kathy Orta's kit club for a little over a year and am enjoying the great, inventive, and interesting mini album projects.  The amount of paper and supplies we get is amazing and very generous. My project today is from Kit Club #11 - The Convertible Album and it looks like a ladies handbag.

I think the reason it is called the convertible album is because you can choose to make it into the purse shape or leave off the closure and handle and just make the wonderful album.  The project also uses a chipboard speciality album with the pieces inserted throughout with a special hinge that Kathy's shows us how to make.

Enough talk.....  here is my decorating take on the Convertible Mini......
I decorated some like Kathy and some like me.

Close up of the front

Here is the back
Just a note about the pages.  The 100 Days of Summer album came out before I started this one and I used the stacked pockets idea in my convertible album.

Inside first cover and first page


Here is where you can see the stacked pockets I added to the design of the mini. It just gives more space for tags and that means we can add more pictures.


 On this page I cut out the round slides "thingy" and attached it to the pocket so that it made another pocket.
I made a fancy tag for this page that opens up and has pockets.
More stacked pockets here. You can also see the added page
with Kathy's special new hinge


I love adding elements to pockets that make more pockets.


This is a really big album because there are 6 pages on both sides of the handle clasp. This is the start of the second section.


More stacked pockets and lots of tags.


Finally the last page!
I really liked this project for a number of reasons; super interesting design and clasp, really two albums in one - 12 pages in all, and the new "add any element" hinge.  Thanks Kathy!

Project Recipe

Tutorial: Paper Phenomenon Convertible Mini Album
Paper: Kathy's kit included BoBunny Mordern Miss, Paper Accents black, cream, red and Navy
Embellishments: Rare Earth Magnets, Trinket charms from Kathy's shop, BoBunny ephemera and a bunch of other goodies from the collection, paper clips from my stash, amazing purse clasp from the kit
Inks: Ranger Distress Black Soot

Hope you enjoyed my project!  Have a super scrappy day!
NancyD