Showing posts with label Baby. Show all posts

Wednesday, September 25, 2013

It's All About Baby's!

I have another baby card to share and this time it is for a boy.    I used this great Simple Stories paper.


When I glued down the flowery strip I left the top section unglued so that I could slip in the two tags.

Card Recipe
Paper:  Simple Stories - Baby Steps, Bazzill Cream and Teal
Markers/Ink: Copics, Distress Broken China
Embellishments: Kraft ribbon, Michael's charm, BoBunny gems, SU Twine


Challenges for this card:

Be sure and take a look at what the wonderful Design Team has come up with for your inspiration. And then hop over to the Delightful Challenges site and check out this weeks challenge.


Have a Great Day!


NancyD

Wednesday, August 28, 2013

For a Baby Girl!

Made this baby card to keep in my stash for the next baby born in my little world.  I thought this bear was so cute and perfect in purple.  These spellbinders nested ovals for the Grand Caliber make a perfect shape and are so delicate.


Card Recipe
Paper:  Whisper White, Plum, Graphic 45 Secret Garden
Markers/Ink: Copics, Distress Dusty Concord
Embellishments: Spellbinders, BoBunny Ribbon, Prima Pearls

Challenges for this card:

Be sure and take a look at what the wonderful Design Team has come up with for your inspiration. And then hop over to the Delightful Challenges site and check out this weeks challenge.


Have a Great Day!


NancyD

Wednesday, May 2, 2012

Welcome To Our New Little Bundle of Joy!


My card this week for Digital Delights is this cute  Little Dumpling  image. I made it just in time for the newest little bundle of joy to be born into our family. My son and his wife, just yesterday, had their first little girl, Adalee Hannah.


Card Recipe:
Adalee Hannah Dawes
Paper:  SU Very Vanilla and Early Espresso, Regal Rose, Simple Stories Baby steps
Marker/inks:  Copics - R85, R83, R81, B01, Y02, Distress Tea Dye
Embellishments:  Spellbinders Label 18, Antique Frames and Accents, Prima pearls, Magnolia charm, Really Reasonable Ribbon,  craft store lace


Challenges for this card:


Be sure and take a look at what the wonderful Design Team has come up with for your inspiration.  And then hop over to the Delightful Challenges site and check out this weeks challenge.


Have a great day!
NancyD

Monday, April 2, 2012

Happy Baby to Come!

My baby son (now 25 years old) and his beautiful wife are expecting their first child at the end of May.  Since she has been having some difficulties the ladies at our church decided to give them a baby shower early. The shower on Saturday was well attended and everyone agrees that my newest grandchild will be the best dressed little girl in our town.  This is the card I made for the gift my husband and I gave them.


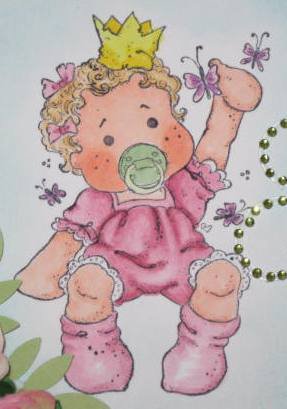
I couldn't resist using one of the new Magnolia Princess images as we know that the baby will be a girl.  This little one is soon to be her daddy's little princess.


Card Recipe:
Images: Magnolia baby girl
Paper: Simple Stories Baby Steps, SU Celery
Markers/Inks: Adirondack Aqua, Copics - Hair - YR20, YR21, E31, Skin - E01, E02, Dress - R85, R83, R81, Soother - G20, G21, Crown - Y02, Y08, Butterflies - V06, R81, C7
Embellishments: Spellbinders Label Twenty-Three, Guipure Cream Lace and Flowers from Wild Orchid Crafts, Leaf Punch from MS, Gems from ZVA


Challenges for this card:

Have a Great Monday!
NancyD

Thursday, March 24, 2011

New Baby Girl!

One of our staff members just had a little baby girl and I needed to make a card to give with our gift.  I wanted to do something a bit different and I had seen a little paper carriage somewhere in blog land. 


I think that blog had a cutting layout, but since I can't remember where it is I needed to come up with my own pattern.  I wanted to use the tools available to me and I was not about to cut out the pieces by hand (bad idea!).  So, I used my Cuttlebug and Spellbinder circles to do the work for me.

I have both the small and large circles, which came in handy.  I used the 3 1/4, 3, 2 3/4, 1, and 3/4 inch circles to cut the base and two layers of designer paper.


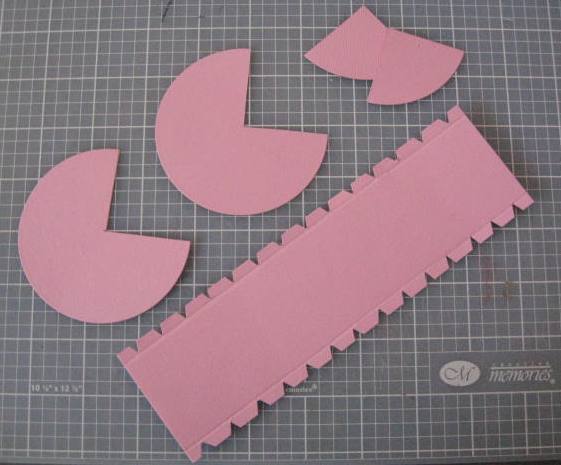
After cutting the two base circles I needed to find the center of each and cut out 1/4 of the circle.


The carriage backing is cut from the same card stock at 2 1/4 by 7 3/4 and scored at 1/4 inch on both of the long sides.  To make it fit better around the circle you will need to cut out little triangles along both edges near the score lines as shown.
Carriage Base Pieces
Next I cut out my coordinating and designer papers.  The handle is a little piece 3/8 by 4 inches.  You can make it thinner or wider depending on the sentiment you want to use.

 Next, I layered all the pieces and began the construction process.  I quickly found that the backing strip needed to be made with really strong adhesive, so be sure to use something like Scoretape instead of a glue runner. I placed the Scoretape on the circle instead of the backing strip.

Working with one side at a time, gently ease the strip around the edges of the circle and press firmly to make it stick.  Make sure that your two edges line up for a clean seam.

After I had the base put together I attached the wheels with brads, then added my embellishments of pearls, lace and a ribbon.


We are going to slip a gift card for baby supplies into the carriage and deliver it this weekend.

Have a go at your own version and let me know how it turns out.

Happy Stamping!