Wednesday, August 27, 2014

Introducing My New ZenFolio!!

This is a project that I have been working on for a couple of weeks and I am so excited to finally share it with you all!!

I am an avid cardmaker and scrapbooker and now a Zentangle artist.  I am consistently working on combining my passion for paper construction with beautiful materials to showcase Zentangle.  This project combines "mini-scrapbook" style construction with a little bit of designer paper and lots of Tangling.

I made a ZenFolio for myself to take my Zentangle supplies with me on my weekly trips up and down Vancouver Island.  I can also use this great ZenFolio to show my Tangling to prospective students and venues for classes.  Tada!!!


I know, it doesn't look like much yet, but I am planning to Tangle all over the cover with Sakura white gel pen and Metalic gel pens. Wait until you see what's inside........


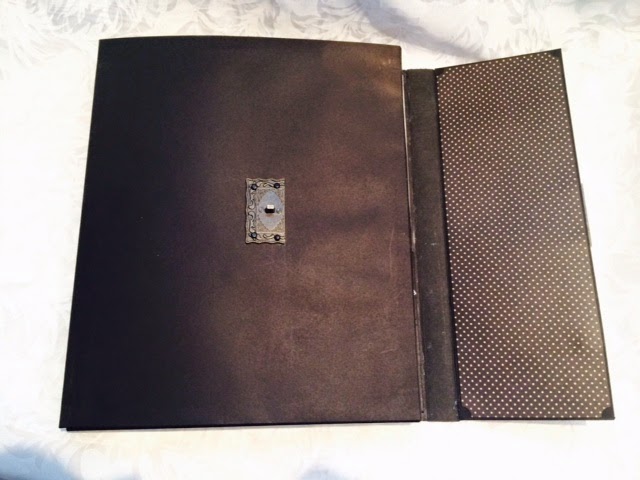
Oh wait, I can't show you the inside until we talk about the construction and the closure.  I found this amazing antique lock closure at a scrapbook store in a little box full of bits of this and that.  I wish I could tell you who makes it but it did not come in a bag with an identifying label.  If anyone knows please leave a comment and I will gladly give credit.


While I did come up with the general idea of my ZenFolio I also had lots of help from a very special designer - Kathy Orta from Paper Phenomenon.  I used her Contessa and Foto Folios as a guide in determining what sections I wanted in my personal folio.  I also used Kraft-Tex as the very sturdy spine between each section of the folio.


When the ZenFolio is first opened I have a sturdy (chipboard reinforced) clipboard to provide a solid surface Tangling.  On the right I have a box with a magnet closure to hold my pens.  Below the pens are little boxes, just the right size to hold regular Tiles and Zendalas.


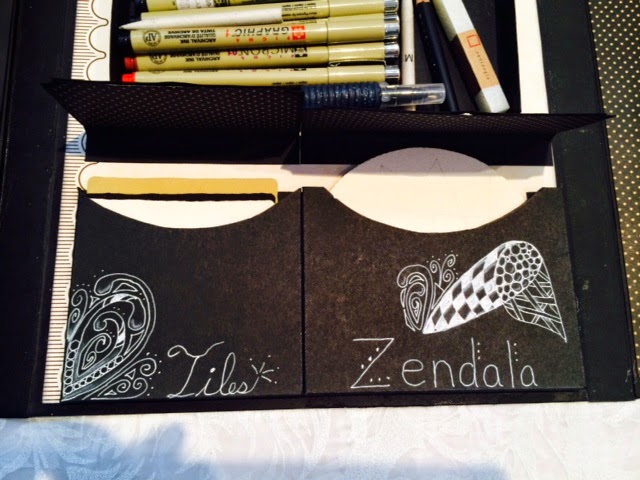
The one designer paper you can see throughout the project is from Graphic 45 Mother Goose collection.  I wanted to add a few bits of dp along with my Tangling to help draw the two mediums together.

But wait, there is more.....
Open the folio to the next step and reveal a section for showing off completed Tiles.  There are four flaps that run the length of the page and hold up to 6 tiles each.


The flaps fold back and forth to show off both sides of what the flap is holding.


Finally, the last section has two large pockets to hold larger items like my copy of TanglePatters.com and extra watercolor paper for ZIA (Zentangle Inspired Art) work.


Underneath it all is a hidden surprise!  This is a piece I did for my original Zentangle blog - Just Tangling Along which I have now folded into Crafting Passions.


Well, I hope you have enjoyed my special project for today.  I'll post pictures of the front and back cover of the ZenFolio when I finish all the Tangling.

Have a great day!!!
NancyD

Friday, August 22, 2014

Zentangle Boxes - Part 2

Last week I posted about a couple of little boxes I made with designer paper to hold Zentangle tiles.  Since then I have made one from watercolor paper that I Tangled all over.


I used lovely black ribbon for the closure.  This box holds about 40 regular Zentangle tiles.  I think I am going to make a tan one for tan tiles and a black with white gel pen for my black tiles.


It's a pretty standard top-flap box cut to the dimensions of any size tile or Zendala.


You only need two strips of strong glue tape to hold the box together at the sides.


Just "like" my Crafting Passions facebook page, private message me your email address and I will send you the instructions (I promise to delete your address after sending!!!)

Have fun making your own Zentangle boxes.
NancyD

Thursday, August 14, 2014

Zentangle Tile Boxes

I have figured out two simple boxes to hold official Zentangle and Bijou tiles.  When I say "figured out" it means math. I remember when I was in high school algebra class someone was always asking why they needed to learn algebra because they were only going to grow up to be a ditch digger.  Of course it didn't occur to me then, but even the ditch digger needs to know how long, wide and deep to make the hole.  They might even need to calculate the volume of dirt that will be removed so they know how many dump truck loads to schedule.  Click here to see a Zentangle version of this box.

You can stop running in circles while screaming now because these cute little boxes do not need any algebra or advanced math skills.  If you "like" my Crafting Passions Facebook page and pm your email address, I will send you the instructions for free!  (I promise to discard your email address afterwards!!!)


The larger box is for regular Zentangle tiles and the smaller box is for Bijou tiles.
The ribbon and bow form a band that keeps the box closed.


The regular tile box measures 4" x 4" and is 1" wide. 
I was able to fit about 40 tiles inside.


The Bijou sized box is 2 1/2" by 2 1/2" and 1/2" wide.
I was able to include at least 20 Bijou tiles.

I used the following products to make the tile boxes:

  • Craft n CraftIn double-sided paper from Best Creation Inc..  This paper seemed perfect to me for these boxes.  Of course you could use plain white or black and add your own Tangles to the design!
  • Offray ribbon from Walmart
  • A Bow-Easy to make the little bows (from Scrapbook Central in Courtenay)
  • Scor-Tape from fellow CZT Diana Crick
  • Stick pin from Wild Orchid
  • EK Success scalloped edge punch

Have a wonderful day!
NancyD

Monday, August 11, 2014

Treasures to Behold!

This project was fun and a bit challenging to create.  It is an old fashioned trunk with lovely vintage papers (Tim Holtz Wllflower), antique handles, leather look straps (chipboard and glossy accents) and old brass screws (brads).

Front View
I made this trunk and two mini-albums from a Kathy Orta kit - Kit Club 10.

Top View
The super fun thing about this trunk are all the hidden parts.  Can you guess where they might be?


On the side is a handle that is used to lift the trunk.  Well this handle also pulls out to reveal a drawer with a lovely mini-album.  But wait! There is more!


The front face of the trunk opens.

And then the little drawer opens!!
So many surprises!!! And lots of room for albums and pictures.  Here are a few pictures of one of the albums.  I decorated it similar to Kathy so no need to show all the pages.


This book has a really interesting construction - each page with pockets and flaps is made out of one 12x12 sheet of card stock.  The flap from one page forms a pocket on the connecting page.  The design is brilliant!


The Tim Holtz Wallflower paper is just so lovely.  The colors are perfect for a vintage look project and there is lots of collaging on the page so I don't have to do any of my own.


This is a really special home decor piece that will sit on the corner of my hearth where I will share pictures of our early married life.

Happy Scrapping!
NancyD

Friday, August 1, 2014

A Scrapbook Challenge Answered!

I work with my local scrapbook store a little bit and teach classes from time to time.  Diane, the owner of Scrapbook Central here in Courtenay BC handed me a plastic pouch put together by Maya Road, filled with all sorts of goodies and asked me to make up a class.  Well that was a challenge I could not refuse!

The packet included a Maya Road ring chipboard album (10 - 5x5 pages), kraft envelopes, lace, ribbon and lots of other trims, charms, clips, letter stickers, wood buttons and cutouts, and more.  The suggested album in the packet was nice, but I am not really a fan of the ring album.  After spending time playing with a few ideas I decided to use the new accordion binding by Kathy Orta.


This is a chunky book with plenty of space for pictures and all the lovely decorated pages.  There were three top loading envelopes and three that opened on the side.  I attached these envelopes with paper hinges to the bottom or side of a chipboard page.  I cut off the top of the vertical envelopes to make room for a tag insert.


I think this will be a fun class!  Come check out Scrapbook Central's website (or call 250-338-8815) and sign up today!

Date: September 13th
Time: 12:30 - 4 pm
Cost: $40.00 (not bad for a finished album and left-over goodies to take home)

See you in class!
NancyD