Monday, September 29, 2014

Foto Folio Mini #3

Many of us in the Paper Phenomenon world have been frantically working through the 6 new Mini Foto Folios.  I say frantically because we all love them and want to make them all.

I posted my first one last week here.  I have constructed #2 but have not yet finished matting all the pages.  However, I have to say that I am in love with the side closure of #3.


I used the My Minds Eye Collectible collection of papers and stickers.  The closure is from Tim Holtz.

Such pretty papers!

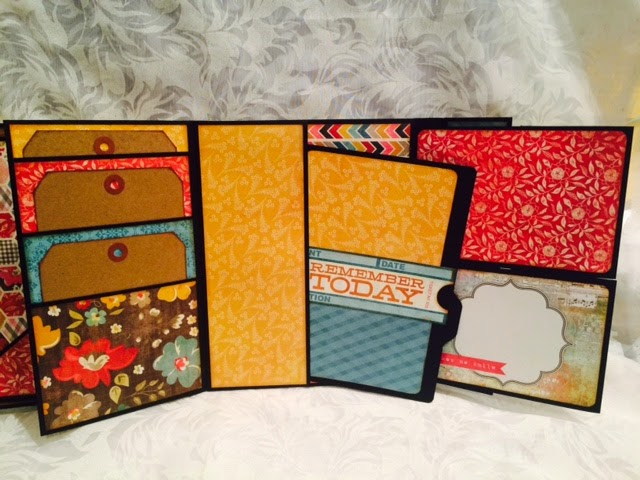
When you open the folio there are two sides, each constructed and decorated differently.


The first thing you see when you open the folio on the left is this really great folded tag that can hold more than 16 photos!  This same folded tag will fit into any of the larger pockets as well.


Lift out the tag and pull back the first layer to reveal two different types of pockets; top loading and closed.


Peal back that layer to find a very generous side loading pocket large enough to hold several 5x8 tags which can hold 4 photos each.


On the right side we start with two cute closed pockets that will hold several #8 Ranger tags for journalling or pictures.


More pics can be placed on the back side of the pockets too.  When you peal back that first payer a cool flap full of pockets appears.  Open that flap and you can see that both sides are full of pockets that hold #8 tags.


This is the final shot of the right side fully open including that large generous inside pocket and tag.

I am enjoying making all the mini foto folios from Paper Phenomenon.  The are easy and fun to make.  Why don't you give it a try?

Have a Scrappy Day!
NancyD
Friday, September 26, 2014

Scrapbooking Heaven - Part 2

We had another lovely evening at Scrapbook Central in Courtenay last night where we made the next set of four pages for our big album.

We had our hearts laid out all over the table - just sayin!


Simple Stories Documented paper sets the stage for these simple layouts.  We used two sizes of Spellbinder Heart dies, a Martha Stewart heart punch and a tiny EK Success heart punch to make all these lovely red hearts.

I love teal!


Vintage Photo Distress ink graces the edges of all the pages and photo mats.  We measured, cut, tore and manipulated papers to get just the right look.

Thanks again to Diane from Scrapbook Central for providing such a nice kit full of wonderful supplies to make our big beautiful album.

Have a scrappy day!
Nancy

Monday, September 22, 2014

The Teddy Bears Are Having A Picnic!

My mom loved teddy bears!  I think at one time she collected over 1000 just for fun.  She made them, stuffed them, dressed them and posed them all over the house (no husband or kids around to interfere in her fun).

This new mini folio style album is made in honor of the wonderful memory of my mom's collection. I found a new collection of paper by KaiserCraft called the Teddy Bear's Picnic and of course the tutorial is from Paper Phenonemon.

I cut the signature page down so that one page fit most of the cover and the key element fit on my curved pocket.  The pocket has room for lots of tags.


When you open the folio you see two sides, each held in place by large flaps covered with the great designer paper.

Open the flaps to reveal more goodness!
Left Side Open Flap

1st flap with tags

2nd flap with tags

Final inside layout under three layers of flaps
The right side holds a secret layer that you can't see unless you sift the paper slightly and then you wonder what's underneath.

Right side open

Lift the top flap to reveal a generous sized pocket.

Open the page to the left and inside are two more nice pockets.

But hidden underneath it all is another great layout.
I also made and decorated a variety of tags for this project.  We often include tags for more pictures and jounalling so that we don't have to cover up the super cute paper.


Well, that is my mini folio album for today.  The album dimensions are 7 x 9 and the spine is made with Kraft-Tex.

Until next time - Have a great day!!!
NancyD


Friday, September 19, 2014

Scrapbooking Heaven - 4 New Layouts

Last night I had the privilege of teaching eight wonderful ladies a number of scrapbooking techniques while we made four layouts.  The class is sponsored and held at Scrapbook Central in Courtenay, BC. We will be meeting for the next five weeks to complete our 20 layout 12 x 12 hardbound album.

I promised the ladies I would post pictures of the 4 layouts we did last night for those who weren't quite finished.


We distressed the edges of all our paper with Distress Vintage Photo


 This page was made from a white 12x12 paper.  We inked three layers of Distress inks starting with Brushed Cordurory covering the whole page.  Then we added about a three inch section all around in Vintage Photo, finishing up with about a 1 inch section of Walnut Stain.  This gave us a lighter area in the center that graduated in intensity to the outer edges of the paper.  Finally we spritzed the page with Smooch Spray.


We used EK Success scalloped edge punch and the Martha Stewart Chevron edge punch.  All remaining supplies came from the kit that Diane from Scrapbook Central put together for this class.  The papers are Simple Stories Documented and Scrap Within Reach Cambridge Collection.

Have fun ladies finishing up your pages and I will see you next Thursday for the next set of papges!

NancyD

Friday, September 12, 2014

My First Christmas Project This Year!

Okay, I know Christmas is more than three months away but someone told me today that it is only 14 Fridays!  Oops, better get started on preparations! lol!

Here is my second attempt at the Vertical Paper Bag Mini from Paper Phenomenon.  The first one is here.


Lots of great BoBunny and Simple Stories Christmas paper here!  I used a variety of techniques to make the decorating more interesting and challenging.  I have been mostly using the wonderful designer papers in my mini-album creations, but this time decided to add  "card making" techniques like pressure embossing, glitter heat embossing, paper piecing, and die flower making.

Generous front and back pockets for memorabilia.


I used three kinds of ribbon and several rubber stamps.

Two kinds of dry embossing enhanced with Stickles.

I added Glitter pen to this stamp.

I added Ink Gold - Red to the brick wall embossing.

Stamps, paper piecing, ribbon, and Stickles, oh my!


Two of the 12 tags in this album


This is such a great tutorial and I have really enjoyed making it now for the second time.  It is a super easy way to get a jump on your Christmas gifts this year.

Project Supplies:

  • Paper Phenomenon Vertical Paper Bag tutorial
  • Paper - BoBunny - Rejoice, Simple Stories - 25 Days of Christmas, Bazzill Black, Red and Green, Kraft
  • Ranger black and tan tags
  • May Arts Ribbon
  • Red Stickles
  • Sakura Gold Gel Pen
  • Ranger Black Soot Distress Ink
  • Sizzix embossing plates
  • Tim Holtz on the edge die
  • Michael's Celebrate It paper sacks
  • Maya Road Let It Snow snowflakes
  • Magenta and Great Impressions stamps
  • BossKut Poinsettia die
Have a great day!
NancyD

Thursday, September 4, 2014

Butterflies a Flutter - Doll House Mini

I have been working on the mini-album that came with the Paper Phenomenon Doll House tutorial off and on since the beginning of summer.  I really love the graphic 45 Botanical Tea collection of papers and they are perfect for this project.


The album cover has a number of cut out elements from the paper collection.  I added Glossy Accents to the butterflies and hummingbird.  The closure came with the Paper Phenomenon kit and is spectacular!  I covered it with Gesso and a little Stickles for sparkle.  All of the paper and chipboard for this project came from the kit.

The pages are made with a special pocket embedded in the design of the top and bottom of the base page.  All other elements are added to the base page as pockets or flaps.  We all used the very lovely Martha Stewart edge and corner punch to add lacy beauty.


The basic page design includes a decorated flap on top of the base page.  The flap has a pocket on the top and the inside.  All 6 pages follow this same format.

Open the top flap
And reveal another flap and pocket
Back of page 1.
Flip the whole page over to reveal more flaps and pockets.
Open "Bird" flap

Back side of flap is perfect for adding 4x6 photos.
And here is a picture of the top loading and pocket loading tags where you can put more pictures and journaling.

All the remaining pages follow the same format and I decorated similar to Kathy Orta so I am only including pictures of the front and back of the next 5 pages.

Page 2
There is lots of space for tags in this album!

Back of page 2

Page 3
Some parts of these pages I left undecorated just because I like the color of the paper!

Back of page 3


Page 4
Love this page the best!

Back of page 4

Page 5 
Back of page 5
I used lots of the cut outs from the paper collection as tags and page embellishments.

Page 6

Back of page 6
This is such a lovely set of Graphic 45 papers!  I can't wait to finish my next project which is from the "My Design Mini" tutorial.

Happy Scrapping!
NancyD