Friday, October 31, 2014

Tombow Design Team Entry

One of the many things that I have enjoyed about blogging is the opportunity to be a part of a design team.  I have been on several teams over the last few years and today I am applying for the Tombow design team.


I have actually used Tombow markers and Tombow Multi Liquid Glue for many years.  The first class I took using Tombow Markers was at the stamping store in Victoria, BC with Marie Browning, Tombow's signature designer.  She showed us how to blend three graduating shades of a Tombow Marker to make a beautiful stamped card.

For our design team submission we are to post a minimum of 3 projects on our blogs, one of which should be a D.I.Y. project.  My first entry is a simple holiday card using Tombow Xtreme Permanent Adhesive,  Tombow WideTrac Correction Tape, a Tombow Marker and glitter.

I used the Xtreme tape to make a line of adhesive on the card base and then added fine glitter.  The Xtreme tape is a very strong adhesive and had no trouble attracting and holding onto the glitter.  I repeated this step until I had 6 gradually shorter lines of glue and glitter.

Next, I swiped the correction tape onto a strip of card stock and used that as a base to write Merry Christmas with a green Tombow Marker.  The white correction tape makes a nice contrast to the green cardstock so that the sentiment shows clearly.

Finally, I layered up my green and gold cardstock and Graphic 45 Christmas paper using more of the Xtreme adhesive.  I added little punched snowflakes with gems and a twine bow to tie it all together.


The card is now ready for a personal greeting from me.

My next project is a pop-up box card that I posted back in 2013 before the craze really got going.  I included instructions in inches with a diagram for scoring and cutting.


I am including this box card post because it speaks to my interest in dimensional projects and learning new techniques.  The characters on the card are from Digital Delights, a design team that I was part of for over 3 years.

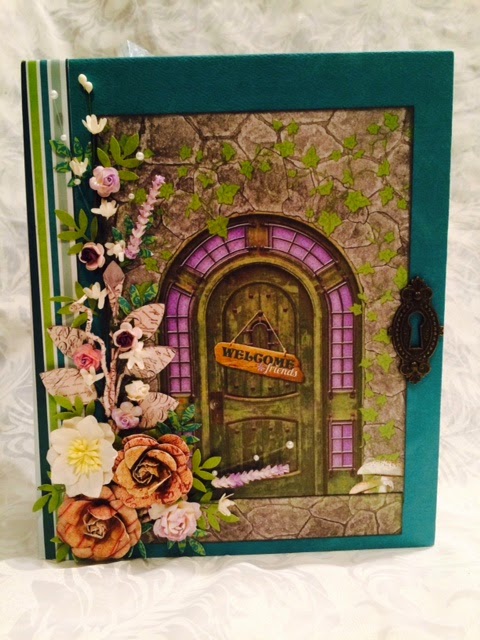
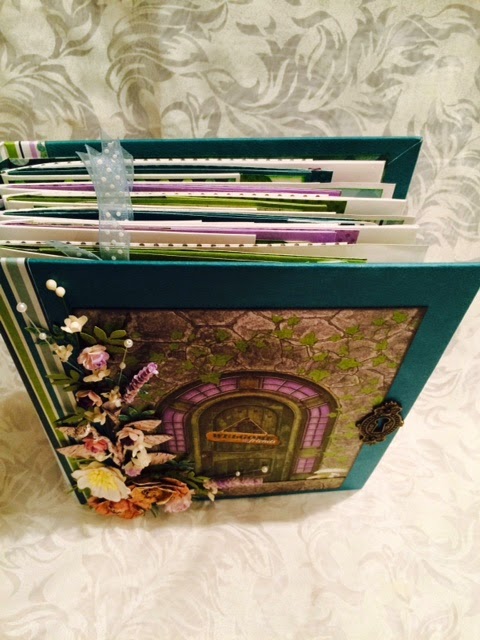
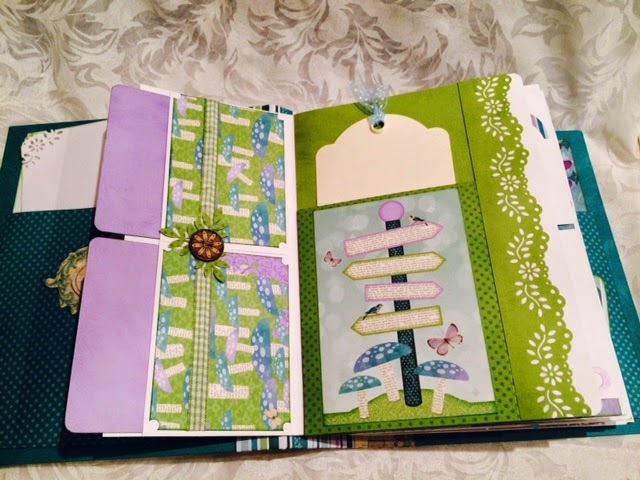
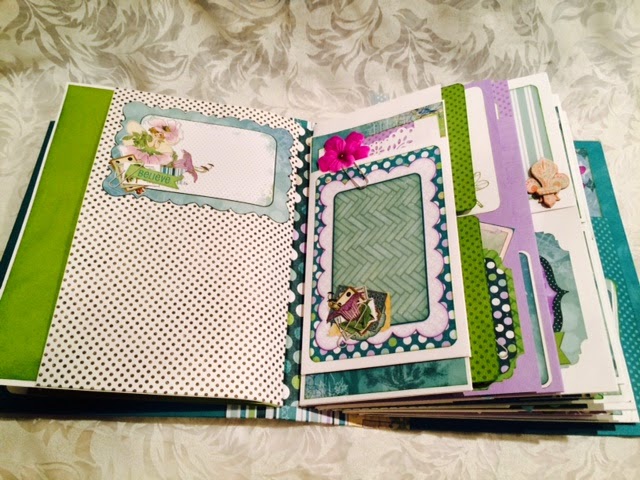
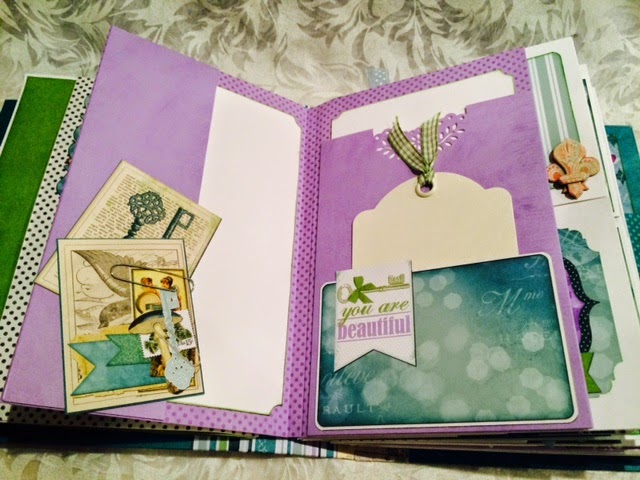
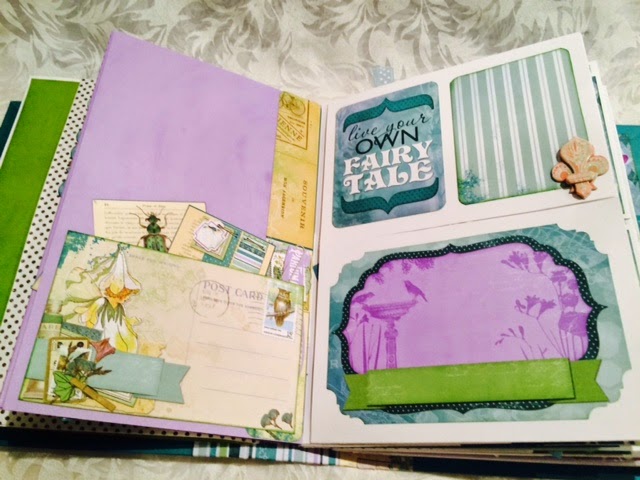
I can't help but include a scrapbook project because I love, love, love making them and they show my interest in working with wonderful designer papers and fancy construction methods.  They also take lots of adhesive!


I fussy cut part of the signature sheet and layered it on top with Tombow 3D Foam Tabs.

I used Graphic 45 Raining Cats and Dogs 8x8 pad and lots of black cardstock.  I am teaching a class on how to construct this book at my local scrapbook store in January.  Here are a few more pictures......


I am including this next project because it shows that I do write tutorials that people read - over 1600 of them (that is 1600 page hits for the flower tutorial post).  This project has had universal appeal because we all love to put flowers on our cards and projects.

 This     or this  

Makes these beautiful flowers .......


My blog is about my passions and my latest passion is Zentangle.  I loved drawing the Zentangle method so much that I took the training and became a Certified Zentangle Teacher last November.  I like to include Zentangle on all kinds of craft projects.

I used Zentangle to decorate a scrapbook......


And a tag with a Prima Doll .....


Wild Orchid Flowers

Lots of ribbon and Tangles


My D.I.Y. offering is a simple home decor project using a tea light, velum, Tombow Markers and Xtreme Adhesive.


First, I cut a piece of velum to 5 1/2 x 4 1/2 inches and stamped my Inkadinkado image onto velum using Tombow N25 black.  Then I turn the velum over to the other side and colored the dragonflies, bees and butterflies with various Tombow Marker colors.


Next, I applied a strip of Tombow Xtreme adhesive along one short edge,  Curling the velum over itself I adhered the two sides together.  The Tombow Xtreme adhesive is perfect for this application because it is a very strong clear tape.


You can leave the finished tea light sleeve plain or decorate with flowers of the season.


I hope you enjoyed this post seeing a few new projects and some slightly older special projects for my Tombow Design Team entry.

Wish me luck!
NancyD


Friday, October 24, 2014

Scrapbook Heaven - Finale

Last night was the completion of a 6-week class held at Scrapbook Central in Courtenay BC to make a large scrapbook album.  We had 8 wonderful ladies who learned lots of new techniques and made a beautiful album full of memories.

First I need to post the pages we made last night because the ladies like to look at the pictures in large format on their own computers to finish up any leftover designing.

Believe it or not this page started out as a white sheet of cardstock.

The theme last night was Steampunk and we had fun with the Sizzix dies and Inka Gold - Copper.  We prepped our white cardstock with Ranger Distress inks - Vintage Photo, Brushed Corduroy and Aged Mahogany. We added clock faces and gears using Walnut Stain and Ink Gold.


When I designed the pages I included lots of room for a personalized title and journaling.

Now on to the pictures of the class.  Some of the folks are shy but I think I got everyone and some pics are with a favorite scrapbook page.

Debra and Karen

Jessica and Sandi

Judith and Debra

Sisters Linda and Cheryl
And the favorite pages.....


I had a blast preparing for and teaching this class.  Thank you ladies for making my Thursday nights so enjoyable.  I will see most of you back at the table for the next scrapbook class on November 20th.

Have a scrappy day!
NancyD

Sunday, October 19, 2014

Zentangle Basics Classes

I have had two really great Zentangle classes recently and have neglected to post the pictures.  This first photo is from the Elder College class that runs 4 weeks.  We are learning the basics of the Zentangle drawing method and then sprinkling in work with Black and Tan tiles.


This is my favorite part of the class, when everyone looks at all the tiles together and gasps.  They realize that they all heard the same teaching but every tile has its own unique artistry.  Love it!!!

My other class was at Scrapbook Central in Courtenay.  I had 5 wonderful students who kept exclaiming, "how cool."  What a wonderful feeling to impart this fabulous mindful drawing method to my students.


Everyone did such a wonderful job!

Happy Tangling!
NancyD

Friday, October 17, 2014

Scrapbooking Heaven - Part 5

Last night was the 5th installment of the 6-week class at Scrapbook Central where eight wonderful ladies continued to build pages in their large albums.

We started the evening with two relatively easy pages, making a great flower with Spellbinders dies, lots of Martha Stewart leaves and Lorelai Leaves by Poppy Stamps.


We used a Sizzix embossing folder to empress a very leafy design into our cardstock and then added lots of Inka Gold copper, green and teal to make a spectacular mat.

Our second set of pages had a surprise interactive element. First we played with lots of bubbles!


We cut the plastic page cover to slip in this extra spot for journaling.

Some of the bubbles were embossed and treated with Stickles

I forgot to post the pictures of two pages we made last week.  Turns out these are the first and last pages in the album.

We used the We R Memories Envelop Punch Board to make our bow.

Added Inka Gold to the Tim Holtz die cut

The real value of a live class of course is the fun the ladies share as well as their stories and personal photos.  See you all next week!

Happy Scrapping!
NancyD

Thursday, October 16, 2014

BoBunny Enchanted Mini Scrapbook

Hi all!  I have another scrapbook to show this week.  I am a little behind sharing my books and I will have to make a few posts to catch up.  This book is one of the My Design Minis from a kit club tutorial by Kathy Orta from Paper Phenomenon.  I love her tutorials and this one is extra special because she is encouraging us to use the pockets and flaps in any configuration we choose.

I used a feature cut out from the paper line to make the front cover and added lots of Prima and Wild Orchid flowers, stems and pearls.  The door lock is leftover from another kit.
This book is 8 1/2 x 10 inches and has lots of space for photos of all shapes and sizes.  There are lots of flaps, pockets and tags.  This design shows off the beautiful BoBunny Enchanted paper collection and allows for over 100 pictures!

Inside the album are so many pages that I am only going to show the first two.  Believe it or not but the following 5 pictures is just one page!

Inside front cover


Turn the first flap to reveal pockets with tags

Next section shows a place for photos and a big pocket

Flaps closed
 The pocket card is held in place with a magnet that keeps the flaps closed.
Flaps Open
Under the flaps is a generous pocket for tags and photos.  There are so many pages in this album I used every bit of paper in the collection.

Here comes page 2......

Back side of page one and start of page 2
Flap open
Turn the page to see pockets and tags and a layout page.

Turn the page to see two general pockets - vertical and horizontal
with G45 tag and ribbon
Finally we get to the last part of the 2nd page.......


Flaps open
Hopefully you saw that I created two slightly different page styles.  There are 6 pages in all using the BoBunny paper, the chipboard pieces, ephemera pack and stickers.  I used white cardstock from Michaels and a Martha Stewart deep edge punch.

See you next time with sample pages from my class tonight at the scrapbook store.

Happy Scrapping!
NancyD