Showing posts with label Hostess Monday. Show all posts

Sunday, May 11, 2014

Digital Delights Hostess Monday - Builder Booklet

Today I have the pleasure of being the Monday Hostess over at Digital Delights!

I made a little booklet/scrapbook for my grandson Austin for his upcoming birthday.  This booklet is made with lots of really cute characters from the new Digital Delights builder series.


The booklet pages are made using the We R Memories Keeper Envelop Punch Board.  One flap is glued down to form a pocket and the other side flap is used to insert into the next envelop. You can find a number of YouTube videos on this construction method.


The only thing I did different was to fold the booklet accordion style.


This is the back where I will put pictures of Austin with BIG trucks.


The inside of the booklet is not quite a story.  I wrote a few words that he should be able to read to accompany each Digital Delights image.


The names of the characters perfectly fits my family.  One son is Brian and of course my name is Nancy.


The only name I fudged was Tool Time Donald who turns out to be Uncle Evan!


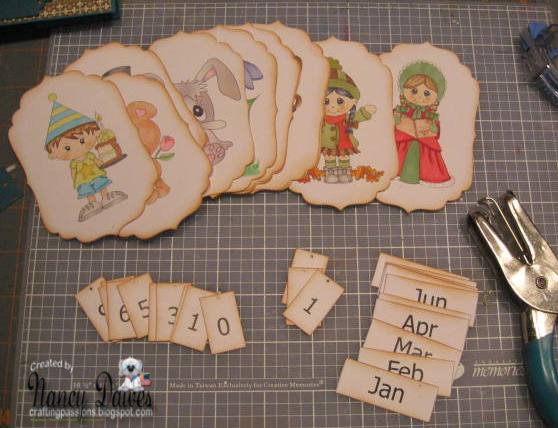
Because these pages are made into envelopes I can fit little tags inside to hold more pictures.

This is going to make a great little gift for my grandson and was very easy to do with pre-colored images from Digital Delights.

Card Recipe
Markers/Ink: I used pre-colored images and just inked the paper edges with Distress Black Soot
Embellishments: Ribbon

 Challenges for this card:

Have a Great Day!


NancyD


Sunday, November 24, 2013

A Christmas Hostess!

This week I am the Monday Hostess over at Digital Delights.  For my project this week I made this cute little box that I found here. I made a few adjustments to make it work for inches and added my Christmas Digital Delights images to finish it off.


Believe it or not, this box lays flat and fits into a regular size envelope.


Side view
 I used Snowball Andie and the House from the Snowball Sarah and Andie set, as well as Snowie Lola and Winder Fun Sentiments.

Start by making the box:

  • Cut a piece of card stock 5 1/2 by 10 1/2 inches
  • Score at 2 1/2, 5, 7 1/2 and 10 inches
  • Turn 90 degrees and score at 2 1/2 inches (on the long side)
  • Cut the 4 box sides and cut out the little extra on the top of the tab
  • Fold on the score lines and glue the little tab over to form the box.

What you have now is a box (with no bottom) with open flaps at the top.  The base of the box is 3 inches and the top flaps are 2 1/2 inch squares.


Cut your designer paper:
  • 3 pieces of 2 3/8 square
  • 3 pieces of 2 3/8 by 2 7/8
  • The back of the box has one longer strip of neutral paper to add your note. Cut a strip 2 3/8 by 5 3/8
Cut two little strips to attach to the box on the inside.  These will hold your images up.  The strips at 3 1/2 by 1 inch.  Score at each edge at 1/2 inch.  Fold them like a Z and glue inside the box close to the top edge.

Now glue in your images and your done!  Have fun making your own Christmas box cards.


Card Recipe
Paper:  Cherry Cobbler, Season of Style dp
Markers/Ink: Copics, Distress Tea Fired Brick
Embellishments: Stickles, SU label punch, BossKut Pointsettia die, Glossy Accents on the Christmas lights


Challenges for this card:
Have a Great Day!


NancyD

Monday, February 25, 2013

Hostess Monday at Digital Delights

Hi everyone!  I have the pleasure of being the Hostess this week at Digital Delights.  I want to show you my take on a calendar that I saw on my team mates site - Rubber Stamping is my Game. I made it for my husband so it does not have much bling!


This calendar works for the whole year and comes with a 
variety of images, days and months.


I started with the basic elements of a side step card.


I cut slits in the Spellbinder die cuts so that the images and the months would slip into the slots.


I printed and colored all the images and used Distress Tea Dye to  color the edges of the images, days and months.


I used jewelers "O" rings to hold the days in place.  
They can be flipped over for each new day.

I used some of my favorite Digital Delights images for this calendar project:


Birthday Cake Josh, Kiss Me Pasquali, Chompers colored, Daisy Flower,
Sailor Simon, Scrubbie Ted

Mr. Gnome, Dazzling Sue, Pumpkin Kiddles,
Fall Girl, Caroling Polly


Card Recipe
Paper: Bazzill teal, SU paper pack
Markers/Ink: Copics, Ranger Distress Tea Dye
Embellishments: Spellbinders dies, Prima pearls, O rings


Challenges for this card:
Have a Great Day!
NancyD

Monday, September 17, 2012

Hostess Monday at Digital Delights

Over at Digital Delights I am the Hostess Monday Designer this week.  I decided to show off some of my Digital Delights scenic cards.  Since making scenes is one of my passions I thought I would share how I have used Digital Delights images to make all kinds of different scenic cards.

Hop over to Digital Delights to see the whole post, but I thought I would show you three of my all time favorites step card scenes.


Down on the Farm

From our Gnome to Yours

Welcome to the Pumpkin Patch

Have a great Monday!!
NancyD