Thursday, May 28, 2015

Gate Fold BoBunny Mini Album

Feathers anyone? 


My mini album today features a BoBunny collection and a wonderful kit and tutorial Kathy Orta called Life in Retrospect.  The color combination is fun and youthful making this an album that could be used for almost any age or occasion.

I made the cover a little different than the tutorial with just one picture frame and place for a title or another picture.  And since the paper line sports wonderful feathers I decided to add a few with beads to dangle from the cover.


The frame on the cover is made so that you can easily slip a 3x5 picture in and even switch it out occasionally. This is a gate fold style that comes together in the center, secured with magnets.


I love this design!  It has so many tags and places for photos that I counted 24 spaces on each page and there are six pages, which means 144 photos to tell a story of an event or a person.  

Here are the pictures of the first page. The left side is a flap that has a folded tag slipped into a belly band and on the back side of the flap is another belly band that hold two folded tags.  Right away that is room for at least 8-10 photos.


Under the flap is the base page with a pocket flap folding from the right side. In front of the pocket is a little pocket that holds more tags and memorabilia.  The flap itself is a pocket which means you can add more tags.  That is just tagalicious!


The backside of the page is made of Kathy's signature stacked pockets making room for much larger tags to hold more photos and journaling.


You can't really see in this picture but the left side is the back of page one with the stacked pockets.  To top it all off, the page mechanism itself forms a pocket where I slipped a very large folded and pocketed tag. 

These pictures represent the general construction of each of the six pages. Here are the rest of the pictures....

Inside page 2

Back of page 2 and start of page 3

Inside page 3

Back of page 3 and start of page 4

Inside page 4

Back of page 4 and front of page 5

Inside page 5

Back of page 5 and start of page 6
Back of page 6 and the inside back cover with tag
 There is so much room in this album that Kathy showed how how to make a tag booklet secured to the inside front cover with magnets.  It has several layers and room for over 10 photos!


Well, I think this is going to be one of my favorite albums and you will be seeing it again here with different papers in the future.

Project Recipe

Tutorial: Paper Phenomenon Life in Retrospect
Paper: Kathy's kit included BoBunny Star Crossed and Authentique Crush
Embellishments: Feathers from Michael's, beads from my stash, Rare Earth Magnets, crate Papre Kiss Kiss Stickers, dies cuts journal cards from the paper lines, papers clips from my stash
Inks: Prima Chalk edgers from Scrapadabadoo

Hope you enjoyed my project!  Have a super scrappy day!
NancyD

Monday, May 25, 2015

Clay Journal Covers

If you have been visiting my blog for some time then you know I like to try new things and this time it is working with polymer clay.  I have been scouting Pinterest and YouTube for months now to learn how to work with clay to make all kinds of interesting things such as journal covers. I first blogged about this back in February and if you look back you can see how far I have come since then.

I like to draw using the Zentangle method and I am always looking for cool paper to make into a Zentangle journal.  When I saw the journal covers by The Mandarin Duck  and The Mandarin Moon, I knew I had to give it a try.

Well here goes, my first two journal covers.....

On this first one, I used black Sculpey III rolled out to 4 x 6 1/4.  I sectioned off an area for sand and an area for sea.  I used PanPastels to colour both areas and then began adding my gems, charms and shells.  I finished off with a little Perfect Pearls for shine and more colour in some areas.


 This second attempt is coloured with Perfect Pearls.  I used a mould for a couple of the shells you see on both covers.


I still have to seal them and glue down to the journals.  I am going to keep one for myself but the others will be available to my Zentangle students for purchase. Let me know if you want one too.

I'll be back when I have more clay journals to share.

NancyD

Thursday, May 21, 2015

Update and Exploding Picnic Basket Mini Album

Hi All, I have been absent of late due to a terrible cold and lots (too much) of travelling.

I have finally completed my Exploding Box Picnic Basket and want to share it with you today.  I started this project at a local crop several weeks ago, but just couldn't finish because I spent so much time talking to my table mates and getting to know them.  It was really a fun time, but I don't think I should count on finishing any projects at crops.

Martha Stewart edge punch and rick-rack for the basket lid trim.

I used 3 sheets of 12x12 papers to make the basket-weave cover.

When Kathy Orta first created this tutorial she made it up as an Easter Basket, but since I was using the Graphic 45 Home Sweet Home Collection I thought it would work better as a picnic basket.

I did however, have a terrible time finding plastic fruit/food for the top of the basket.  It seems the 70's really are gone (yay!).  I remember as a kid that almost every parent or grandparent had a basket of plastic fruit on a table, but I could only find grapes at the dollar store!

Here is an inside look.....
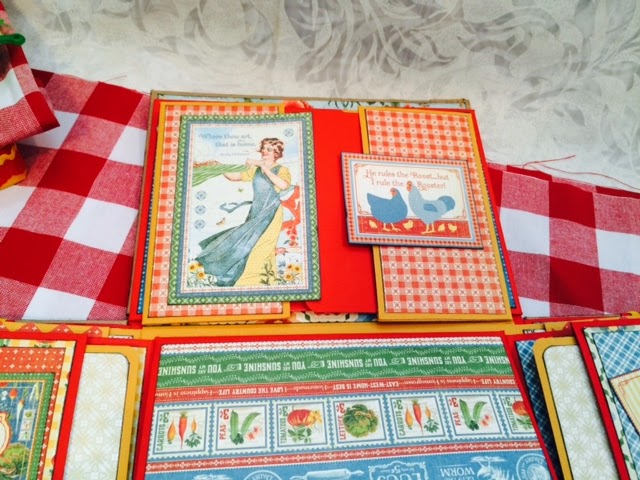
Remove the lid and three layers open up on the table.

Each section has a pocket for tags to hold pictures and journaling.

I used the stickers and tags in addition to 8x8 papers.
Here is a look at the 2nd layer ......


And the 3rd layer .......


This is a great project and I am sure you would love making one of your own.  Check out Kathy's tutorial and give it a try!

Project Recipe

Tutorial: Paper Phenomenon Easter Basket
Paper: Bazzill Red and Yellow, Graphic 45 Home Sweet Home colelction 8x8, a few 12x12 papers and the stickers
Embellishments: Martha Stewart Lace Edgy punch, fabric flowers from the Dollar Store, Little yellow rick-rack, and plastic grapes from the dollar store, an apple stamp from Michael's
Inks: Prima Chalk edgers from Scrapadabadoo

I am entering this great project into a couple of challenges:


Have a wonderful scrappy day!


Saturday, April 25, 2015

Tangle U 2015 Musings

Last week I posted that I was on my way to Tangle U 2015.  This is the CZT (Certified Zentangle Teacher) continuing education put on my Elaine Huffman.  114 CZT came together for more learning, fun, Santa Fe sights and food (of course!). Three of us from Vancouver Island were present: Barb Round, Marie Browning and Me!


My hubby came too and we met lots of new people and made a new friendship with Char and Mike from California, and Sheila and John from Ontario.  The guys drove around New Mexico while the ladies enjoyed fabulous classes. On the way to dinner one night I found these interesting ladies pants. The design is a lot like the Tangle pattern Printemps.


Friday morning we woke to SNOW! I couldn't believe that I had to travel over 1000 miles just to get snow.  There hasn't been any in my town of Courtenay this year and we usually get a least two little snows! It didn't last long, but it was a surprise!


All the classes and sharing opportunities were fabulous!  I learned so much that I am trying to debrief through all the materials I brought home so that I don't forget too much.  My favourite class was with Sharla Hicks from Southern California. The most inspiring quote of the day for me was her comment that "more is more".
She encouraged us to add elements to the foreground and background of our piece.  This is from my notebook and represents some of what she taught.


Since I have been home I made another attempt at the techniques and I really like what is happening to my drawing.


Well, all good things have to come to an end and on Sunday we said our goodbye's.  We left amid hugs and email exchanges and hopes of seeing each other again at the next Tangle U.

On the way to the airport Dave and I decided to drive the old road called the Turquoise Trail instead of the main highway from Santa Fe to Albuquerque.  We stopped at a vary small town to see what there was and snapped this pic of Dave in front of an old engine.


We couldn't help stopping at the next little town of Madrid.  Turns out this is the town where Wild Hogs was filmed!  Apparently Maggie's Diner has never been a dinner but a little town store.


I'll leave you with a picture of all the Talavera swamp tiles that we exchanged between us all.  And if you are a CZT, I look forward to seeing you at the next Tangle U in Maine!


NancyD
Monday, April 13, 2015

Zentangle Butterfly from Stencil

I've been working in my sketchbook lately trying different Dream Weaver stencils that I purchased at Tangle U 2014.  This one is a beautiful butterfly and suitable for this weeks Diva Challenge. We are to trace an object to use as our string.


Tangles used are Ennes, Brayd, Floorz, and Shattuk. You can find step-outs for these tangle on TanglePatterns.com.

I'll be heading out to Santa Fe, New Mexico on Thursday just in time for Tangle U 2015.  I hope to meet many more CZTs and find more enticing art goodies like these Dream Weave stencils.

Happy Tangling!
NancyD

Birth Date Reminder Project

I don't know about you, but I sometimes have trouble remembering birth dates and how old the grand kids are each time.   I made a practical and pretty birthday reminder book to help me keep track of all the birth dates for family and extended family.


This is the front cover of the folio (no hard chipboard covers this time).  I used Pebbles Birthday Wishes paper pad and the Paper Phenomenon Foto Folios #2 Style 5 tutorial.

Back cover
This is a big folio! Here is the book in the first open position.  There is place for tags or cards or anything I want to put in the pockets.


Open up the two sides and you can see the whole spread, Whew! It is very long but holds information for all 12 months in one neat place.


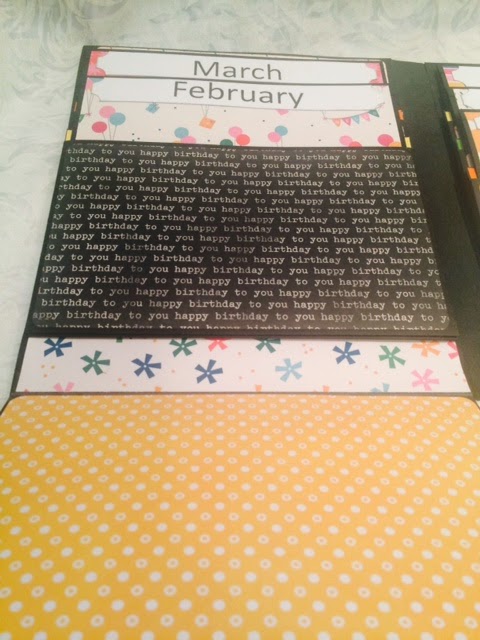
Each month has its own pocket.  There is place for pictures on the front and back of each pocket - the pockets flip down. 


In each pocket is a folded tag for each month.  On this tag I plan to put a calendar with all the birth dates for that month. There is lots of room so I also plan to put pictures of the family members with a birthday that month.  Here are a few close ups of the pages.....


Underneath all the pockets I made acetate pockets to hold pre-made birthday cards.  After all, what's the point of knowing the birth date if I don't actually send out a card! lol!

As you can see I already made a few cards with the paper collection.


Making this was easy from Kathy's great tutorial and I had a lot of fun making such a practical reminder.  Now I just need to get all the birth dates put on the calendars!

Project Recipe:
Tutorial: Paper Phenomenon Foto Folio #2 Style 5
Paper: Pebbles Birthday Wishes 12x12 pad and Cardmaking Pad, Recollections 12x12 black paper
Embellishments: Pebbles Printed Chipboard Shapes, Tags
Inks: My new Prima Chalk Edgers that I one from Scrapadabadoo - Black and Brick Wall

Have a happy day!
NancyD